Adding and managing tasks on a work order
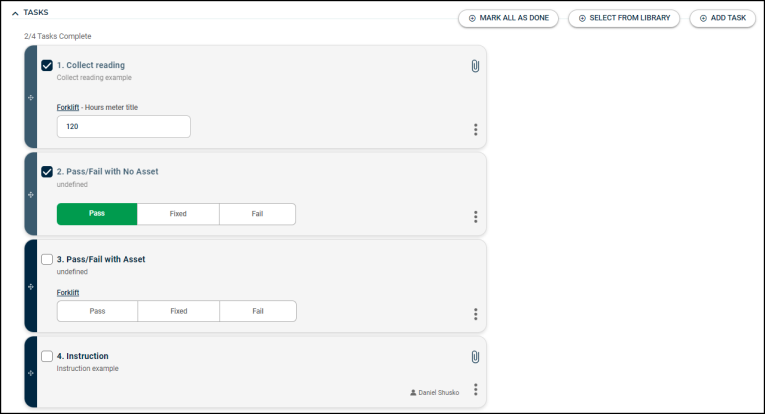
Asset Essentials allows you to create a list of tasks for the worker to follow. You have the option to either create a new task by clicking the Add Task button or you can select an existing task from the Tasks Library. *Note: The Tasks section will not show on the work order form until the work order is saved.
Task types
There are 3 task types to choose from when creating tasks on your work orders:
-
Instruction - use this task type for generic step-by-step tasks
-
Collect Reading - use this task type if the worker should record any meter readings from an asset. *Note: If you select Collect Reading, you must also select an Asset and a Meter Title.
-
Pass/Fail - use this task type for inspection-like tasks that require a determination that an asset passed a review, failed a review, or failed the review but was able to be fixed. If the task is marked as failed, you have the option to generate a new follow-up work order right from the task. *Note: If you select Pass/Fail, you must also select an Asset.
How to add tasks
Adding a task from the tasks library
- Click on Select from Library.
- Check the box next to any task you would like included on the work order.
- Click the Copy button to transfer the tasks to the work order.
Adding a single task
- Click on Add Task to create a new task on the work order.
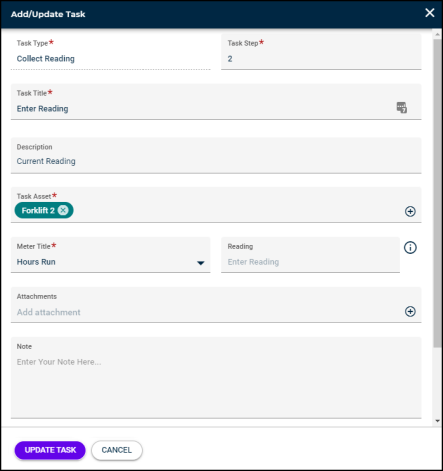
- In the Task window, select the User responsible for the task from the drop down menu or click the user icon (
 ) to select a user from the list.
 - Enter the Name of the task as well as the Description.
- Select the Task Type.
- Instruction - generic step-by-step tasks
- Collect Reading - when meter readings need to be recorded for an asset. *Note: You must also select an Asset and a Meter Title with this task type.
- Pass/Fail - for inspection-like tasks that require a determination that an asset passed a review, failed a review, or failed the review but was able to be fixed. *Note: You must also select an Asset with this task type.
- If you need to add an attachment to the task, click the plus icon in the Attachments section and select a document from either your Document Library or upload a file from your computer.
- Repeat these steps to add as many tasks as needed.
- If necessary, you can reorder the tasks by clicking on the dark blue section on the left side of each card and dragging and dropping them to a new location in the list. This automatically updates the numbering of the tasks.
How to manage a task
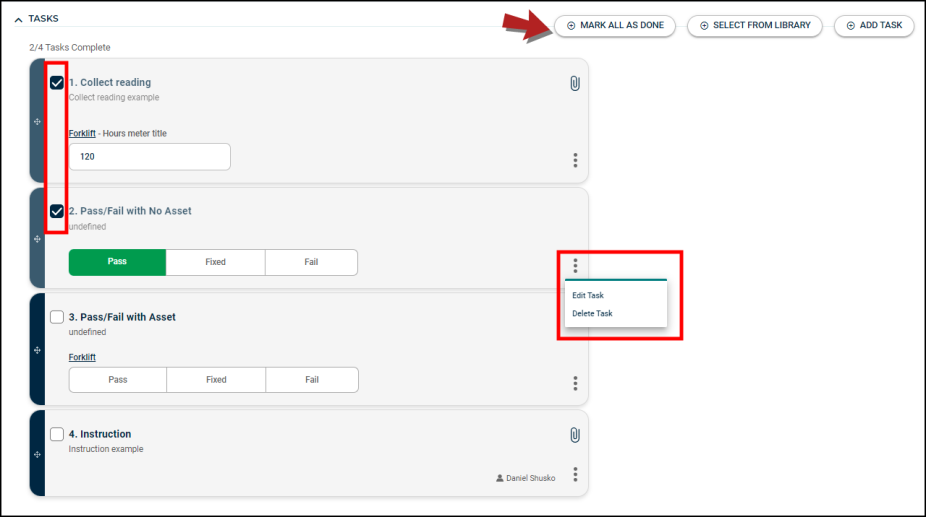
You can make changes, add an individual note, mark a task complete, or delete a task on a work order.
-
To edit the content of a task or add a note, click the three dots at the bottom right of the card and select Edit Task.
- Adjust any fields that are necessary in the window that appears, such as the Step number, User, Description, or Note.
- Click Update Task.
- To mark an individual task complete, click the box to the left of the task number to check it as done. You can click the box again to remove the check if the task was marked done accidentally.
- To mark all tasks complete, click the Mark All As Done button at the top of the Tasks section.
- To delete a task, click the three dots at the bottom right of the card and select Delete Task. *Note: The Delete Task option may not be available on PM generated work orders depending on the system settings.
Generating a work order from a failed task
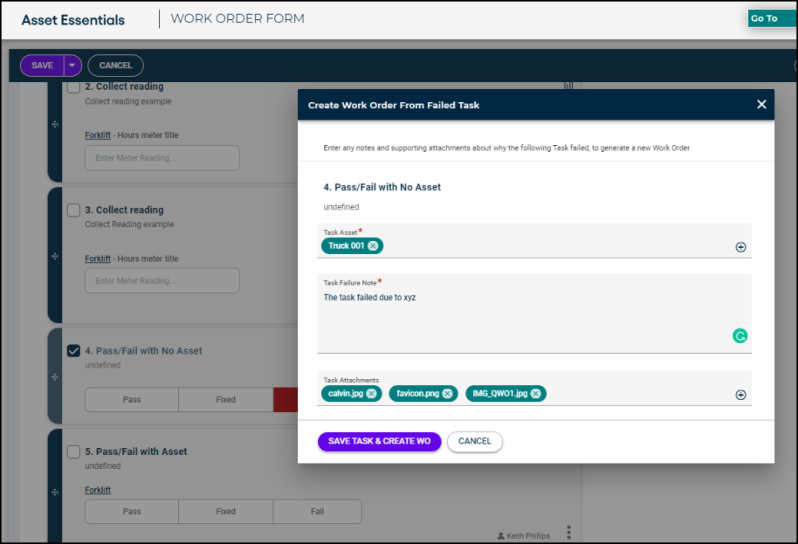
If you have a Pass/Fail task that is marked Fail, you can create a new work order right from the task for the follow-up work that needs to be done to fix the issue.
Select Fail from the task options.
The Create Work Order From Failed Task window displays.
The asset from the task will already be listed. If there is no asset on the task, the asset on the work order will be listed. *Note: If there are multiple assets or no assets listed on the work order, you will need to select an asset from the list provided to continue creating the new work order.
Enter a Task Failure Note. This will populate in the Work Requested field on the new work order. *Note: The first 50 characters of the Task Failure Note will also be used as the WO Title.
Add an attachment if needed.
Click Save Task & Create WO.
You will see a confirmation that the work order has been created and will go back to the task list on the original work order to pick up where you left off.
That task will show the newly generated work order number for reference.

Click on the work order number to view the details of the new follow-up work order.
If you need to make edits to the new work order, click the Go To Work Order button. *Note: If you have unsaved changes on the current work order, you will be prompted to save before you are directed to the new work order.
Viewing the Parent Work Order
When you are on the work order that was created from a failed task, you can easily view the parent work order it was created from.
Scroll to the Associated Work Order section of the work order form.
Click View Parent Work Order. *Note: This button will only appear on work orders that were created from a failed task.
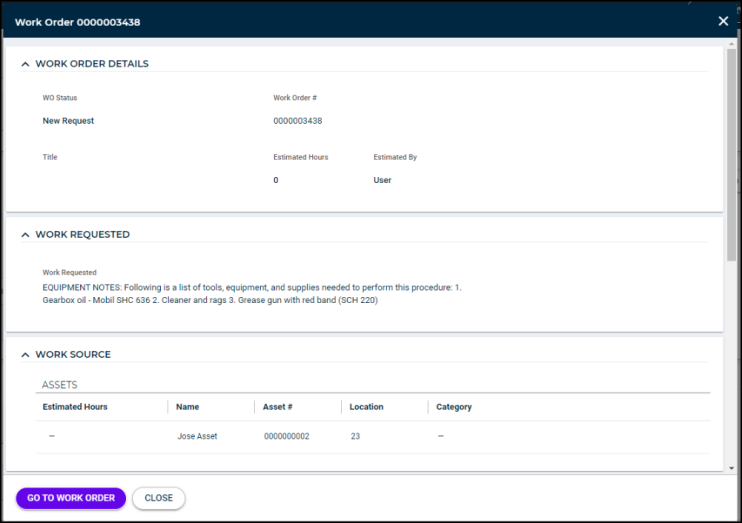
This opens a window where you can view the details of the original work order.
If you need to make edits to the original work order, click the Go To Work Order button. *Note: If you have unsaved changes on the current work order, you will be prompted to save before you are directed to the other work order.

